How to insert an image in excel? How to edit and what to do if things go wrong
Don't you think that it would be better if you could put an image in Excel, which is full of text?
Excel is a tool for creating tables.
Can I include an image?
However, it is surprisingly easy to insert images into Excel.
In this article, I will show you how to insert an image into Excel. Please try the challenge.
Table of ContentsHow to insert an image into Excel
From here, we will introduce how to insert an image into Excel.
There are three main ways to do this.
・Paste an image saved on your computer
・Embed a computer screenshot (whole/part)
・Insert an image from online
It's easy if you follow the steps. I'll show you how to do it below.
Paste an image saved on your computer
This is how to paste an image saved on your computer to Excel.
You can paste images saved on your computer, such as images taken with your own camera or smartphone.
STEP1: Move the cursor to the cell where you want to insert the image.
STEP2: Click "Insert" from the menu above. Next, click "Image" to select the source of the image.
STEP3: The file on your computer will open, so select the image you want to insert.
As shown in the figure below, you have successfully inserted an image into an Excel sheet.
STEP4: If you want to change the size, click the image and move the cursor to the lower right to change the size freely.
You can also drag the image to move it wherever you like.
Now you have successfully inserted an image saved on your computer into Excel.
Embedding a computer screenshot in Excel
The next step is to take a screenshot while operating your computer and paste it into Excel.
STEP1: Move the cursor to the cell where you want to insert the image.
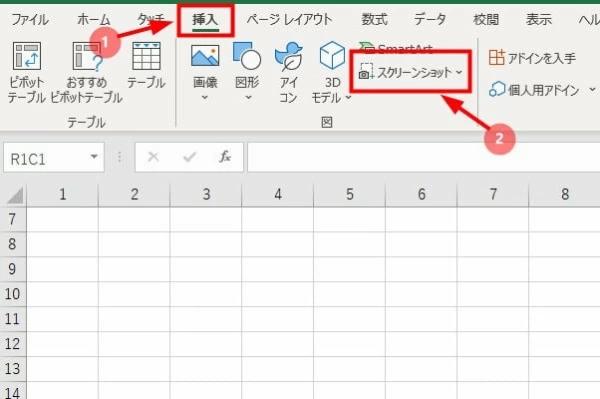
STEP2: Let's click the menu "Insert".
STEP3: Click "Screenshot" in the menu.
STEP4: Click "Screenshot" to display a list of available windows. Select the window you want to insert into Excel.
STEP5: Now you can insert a screenshot of your computer screen into the Excel sheet.
Screenshot and embed a portion of the computer screen
When embedding the screenshot image in Excel in the previous section, you can also specify the area you want to capture.
STEP1: Select "Insert" -> "Screenshot" to display a list of available windows.
STEP2: Click on the "Screen Area" menu at the bottom.
STEP3: Since the "+" mark is displayed on the screen, specify the area you want to take diagonally.
Press the mouse button at the starting point and move the mouse diagonally.
STEP4: Then a screenshot of that part will be taken and automatically inserted into the Excel sheet.
Since a screenshot will be taken when you release the mouse, some tricks are required. If you fail, let's specify the range of the screenshot again.
The point is to display the computer screen you want to take a screenshot in advance.
You can freely change the size of the screenshot displayed in Excel by manipulating the ○ mark in the outer frame. You can also place it anywhere you like.
Putting online images into Excel
Excel makes it easy to find and paste images online.
This is a very useful feature if you don't have the image you want on your computer.
However, in this case, you need to pay attention to the copyright of the image.
Let's see how to insert an online image into Excel.
STEP1: Move the cursor to the cell where you want to insert the image in the Excel sheet.
STEP2: Let's click "Insert" from the menu.
STEP3: Click "Image" to select the source of the image. Click "Online Images" at the bottom.
STEP4: A list of online image categories will be displayed.
This time, I chose "Dog". You can also search for images using keywords.
STEP5: More "dog" images were displayed. This time, select "Creative Commons only" to search for images.
STEP6: Select the image you want to insert and click "Insert".
STEP7: As shown below, the online image has been inserted into the Excel sheet.
You can freely change the size by clicking the image. You can also place the image anywhere you like.
Be aware of copyright when using images. Copyright will be discussed later.
Inserting multiple images
"Insert online images" also allows you to insert multiple images into Excel at once.
STEP1: When the image list is displayed, select multiple images you want to insert and then click Insert at the bottom right of the screen.
At this time, the number of selected images is displayed in parentheses on the right side of the "Insert" button.
STEP2: Multiple images have been inserted into Excel at once.
The images will be inserted overlapping each other, so it is a good idea to place each image where you want it and adjust the size.
Next page: How to edit images in Excel NEXT


![[Excel] How to paste images such as photos and diagrams [Excel] How to paste images such as photos and diagrams](https://website-google-hk.oss-cn-hongkong.aliyuncs.com/drawing/article_results_9/2022/3/9/72539ecbf7413c05e4465b39ca06e8e0_0.jpeg)


